LeadFinder - Knowledge Base
Overview
LeadFinder is an extension that helps users find leads or businesses by letting them use certain keywords, locations, and a set radius. The extension makes use of Google APIs, such as the Places API and the Maps JavaScript API. LeadFinder can also get email addresses from business websites, in addition to these APIs. Users can then download the data, view it on a map, or import it into any CRM module.
Keyword:
What to input?
Input a desired keyword
that you want to search for. For example, if you want to get results
for the software houses near you, you will enter the keyword “software house” or “software” to get desired
results from the extension.
Location:
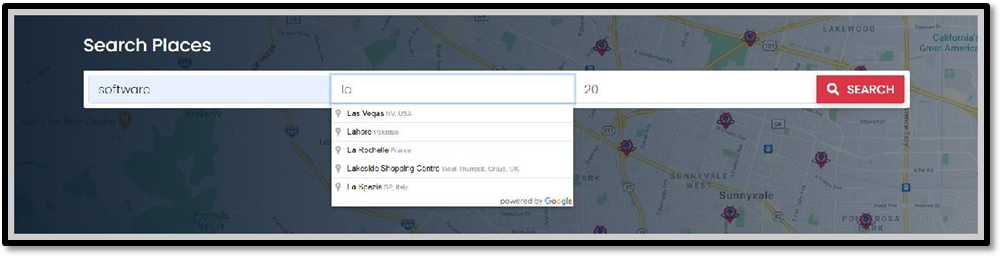
What to input?
After the keyword, the next thing you need to do is type in a location. You can put in any place where you want to get the results.
Radius:
What to input?
You can add a radius in kilometers. Keep in mind that it can be any positive number except 0 and negative numbers 1, 2, 3, 4, and so on.
Filters:
What are the filters
for?
Their purpose is to filter out the fetched data the way
you want. Just turn on the desired filters for which you want to get the data
related to. For example, turn on the Telephone filter if you want to process
only those leads that must have a telephone number associated with them.
Actions:
1. Select All / Unselect
All:
Each lead or company you wish to import or download can be chosen separately. By disabling this filter, you can use "Select All" and "Unselect All" to process all of the data.
2. Import
Use these procedures to import data into CRM after choosing leads or businesses.
- If you want to store reviews in Notes, turn on the switch in the first step. If you want to store reviews in a multi-line field, turn it off. The next step is to click "Next" after choosing the CRM module you wish to use to store the data.
- The module field mapping occurs in the second step. To accurately map the data into your CRM module, choose a particular field for each attribute. With the exception of the Latitude, Longitude, and Zip fields, which should be decimal, every field has a single line data type. Additionally, the Reviews field ought to be multi-line. To continue, click "Next."
- The third step reflects the summary of the data to be imported. Click ‘Import’ to save the data in your CRM.
- Click ‘Finish,’ and you are done importing the data to your desired module.
It works for the leads if you want to import only the leads coming
from LeadFinder. For the leads (that
can be the industry) with the
contact persons (owners, managers, employees, etc.). You must toggle the “Import Contact Person” button.
Map the contact
person by selecting
the module along with their associates.
If you are selecting the module as Leads, the associated modules of Leads will automatically load in the dropdown; just select an associate, and the lead will be added to the module that you have selected, and the contact persons will be added to the associate modules, establishing a connection between both. For establishing a connection, there must be a linking field that you can easily select from the dropdown.
Download:
Other than
importing data to your CRM, you can download
selected records in a .csv file
for your future needs.
View on Map:
This action will let you visualize all leads on a map.
List View/Grid
View:
Toggle between List View or Grid View to visualize the data the way you like.
Bulk Emails:
Bulk emails provide you an opportunity to send emails to
the selected data. Also providing an embedded AI-based email writing button in the LeadFinder extension so that the user is able to find leads and send them an attractive/engaging
email to grasp
the leads' attention and convert them to your potential clients.
Social Links and Contacts:
Through
LeadFinder, you are also able to get the contact person of the leads.
For example, if you are searching for a company
and their contacts
have profiles on LinkedIn, the button
“Get Contact Person” will be shown
below that lead. Click this button to get a complete list of the contacts.
The list view of the contact opens a pop-up of
the listed contact persons. It includes the contact person's name, designation, and a clickable
LinkedIn profile URL of that person as shown below:
Profile and History:
At the top right of the LeadFinder, the user is able to see his profile
status and history.
Your searches, Owner Lookup
and AI-generated Emails appear here.
Integrations:
In the profile settings you can check the integrations
for both the API key and the connected LinkedIn account. Associate it once, and LeadFinder
will remember your choice until you update or
disconnect the account.
Trial and Paid Version:
In the trial period, the user is able to make 10 searches, 2
owner lookups, and 10 AI-generated emails. Once the limits
are availed, the user needs to associate his own API key
and buy the extension of LeadFinder from Zoho Marketplace.
While in the paid version, a user can make unlimited searches, 100 emails, and 100 owner lookups after setting up his own Google API key.
Google API Key:
We provide a 10-day trial
for the Google Maps API key with the extension. After the expiration of your trial period, you can set up your
own API key. Refer to our Google Maps API Guide document
if you need any help.
Support & Related articles
- LeadFinder Release Notes
- LeadFinder Google Maps API Guide
- LeadFinder Frequently Asked Questions
- For any other queries please Submit Tickets
In case of any issues during setup or installation, please feel free to contact us at.
Related Articles
LeadFinder - Frequently Asked Questions - FAQs
Frequently Asked Questions (FAQs) 1. What does LeadFinder do? LeadFinder is an extra tool in Zoho CRM that lets people search for leads or businesses by keyword, location, and a set distance. It gets emails from business websites and uses Google APIs ...LeadFinder - Google Maps API Guide
Google Maps API Guide With the extension, we give you a free Google API key, but it will only work for 10 days after you install the extension. So you need to set up your Google API key to use this extension. To keep you up to date, we will send you ...LeadFinder - Release Notes
LeadFinder – Release Notes Year 2024 Version 2 Published on: Jul 25, 2024 Release Overview A major update expanding the capabilities of LeadFinder with enhanced contact discovery, improved usability, and stronger integration features. What’s New / ...MapView Knowledge Base
1. Introduction 1.1 What is MapView? MapView is a Zoho CRM extension that transforms CRM data into real-time, interactive geographic insights. It enables users to visualize Leads, Accounts, Contacts, Deals, Vendors, and Custom Modules directly on a ...Map View for Zoho CRM - Release Notes
MapView for Zoho CRM – Release Notes Year 2025 Version 4.1 Published on: Dec 21, 2025 Release Overview This release focuses on improving clarity and accuracy in product documentation by refining release note descriptions. What’s New / Enhancements? ...